
If you’ve heard me on a podcast, or seen me at a virtual conference, maybe you’ve been surprised at the audio and video capabilities I bring. Enough people have asked me to write them up, so here you go. I have four “modules” of my system, so I’ll talk about each of them separately.
Computers
While I have three computers on my desk, only two are really relevant for live production.
My primary desktop is an 8-core Mac Mini M1 with 16GB of RAM. I have an external Thunderbolt3 hub (IOGEAR GTD-733), which gives me both an extra ethernet port, as well as a DisplayPort. My primary monitor is an ASUS XG49V. My secondary monitor runs through an HDMI splitter, one of which goes to a teleprompter (see Desktop Video, below), the other to a confidence monitor (see Green Screen Video, below). The primary desktop, and the Desktop Video systems, are plugged into a UPS, which is, after an annoying power outage where it kept beeping while I was on a zoom, now set to mute.
My secondary desktop is mostly irrelevant to this, but since it’ll show up in pictures, for completeness: it’s also a Mac Mini M1, which I use for video production, and sometimes for writing. It has two monitors, one of which it shares with an XBox.
My third system is a laptop, an ancient and decrepit Macbook Air that even my kids don’t want to interact with. I use it for traveling (email and GDocs), and for presentations. It’ll appear below in Desktop Video.
Desktop audio
The core of my audio setup is a RODECaster Pro, which is a little overkill for my uses right now. It’s connected via USB-C to my primary desktop.
The RODECaster Pro has two microphones persistently connected. My primary mic is an ElectroVoice RE-320 on a [boom arm name]. I use that most of the time. The secondary mic is a Shure SM7B on a [boom arm, which I don’t recommend], which is a holdover from when my desktops were in different rooms and I could take calls anywhere. Nowadays, I use it for when I’m going to turn away from my monitor while on a call (the mic sits off to one side).
I also have a Belkin powered lightning-to-3.5mm adapter connected into the RODECaster, so I can leave my phone both powered up and connected. I can play sounds from my phone directly into computer-based audio/video calls, and I can use my audio setup to make phone-calls (or other app-based communications). This most often gets used to play music while waiting for a zoom meeting to start.
For audio output, I have a pair of BASN in-ear monitors that I wear (connected to the first output on the RODECaster, which is the only output that lets you independently control which audio inputs it listens to). I have a pair of studio monitors that sit on either side of my desk, which I use either to listen to music, or when I’m listening to an event that I’m not speaking in.
Additionally, not routed through the RODECaster Pro, I have a Jabra 410 speakerpuck. I usually use this if my wife and I are participating in an event together (if we’re not on separate systems).
Desktop Video
When I’m on a video call, I want high quality video. The heart of my video system is currently a Blackmagic ATEM Mini Extreme ISO (this is what enables the coolest feature, green screen plus picture-in-picture effects). The ATEM is connected via ethernet to the Mac Mini (main output), and it has eight HDMI inputs, plus an HDMI output which can show any of the inputs, or preview the next programmed change, or show a control panel with all of those, plus the actual video being sent to the Mac Mini. First I’ll list what is connected where, and then I’ll explain how I use the ATEM to control different scenes.
HDMI input one: the main camera. My main camera is a Canon EOS-RP, with a Canon 24-105 lens. Since the bookcase behind me is about 5 feet behind my head, I’ve got the aperture cranked all the way to f/14 so that both I and the books are in focus, but that means I need a lot of light. The camera is mounted on a PrompterPeople 15” teleprompter w/monitor, which itself is on a video tripod. For lighting, I have two keylights, one to either side of my desk; they are Neewer 660s. (Note: one is in a good spot, but the other has to be a little too close to me so it doesn’t reflect on the plaque behind me). This does put a bit of glare on me, so if I’m being recorded, I use a face primer (Elizabeth Mott’s Thank Me Later Mattifying) and powder (Revlon Colorstay pressed powder, 840 medium). When I get off camera, I use Neutrogena makeup remover towelettes.
HDMI input two: My over-the-shoulder camera. This is a Canon EOS Rebel T3 next to my secondary desktop. Mostly, that camera points at the main desktop setup so I can show it off.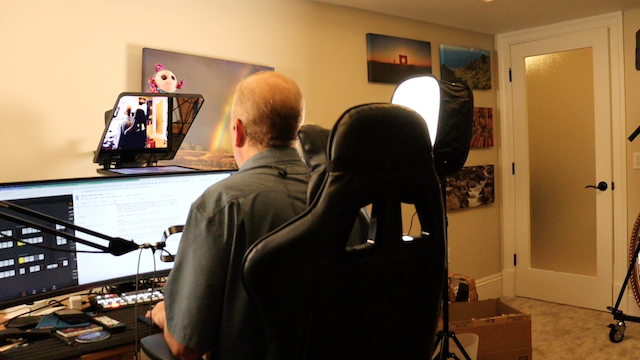
HDMI input three: My laptop. The Macbook Air has a Belkin USB-C hub. This gives it power and ethernet, plus an HDMI port to connect to the ATEM. One USB port is used for an ergonomic mouse, and the other for a Logitech remote for advancing presentations. When I travel, I take this laptop, with a different USB-C hub and the presentation clicker.
HDMI input seven: This connects to the Green Screen Video setup.
HDMI input eight: Remember the HDMI splitter coming off my primary desktop? One of its outputs connects in here.
HDMI output: This goes right to the teleprompter monitor.
Primary use: Videoconferencing. The HDMI Output is set to Input 8, and the main output is set to Input 1.
Use: Showing Slides. If I want to show slides without sharing my screen, I can do one of to things: using the ATEM’s hard-coded picture-in-picture setup, make the slides on my laptop primary (input 2), and my face as in the inset (input 1); or I can use a programmed setting which has my face as the primary, and a custom picture-in-picture setup with the slides consuming a quarter of the screen. I only do this for simple, easy to read slides, or sometimes just putting up a picture.
Use: sharing my screen. If I want to share my screen, I’ll move the content I want to share up onto the secondary display (the teleprompter), and then switch the main output to Input 8. (If I do this when there is a Zoom window up there with self view on, there is a cool infinite mirrors effect).
Use: showing off my setup. With the Rebel plugged into input 2, I turn on the Rebel (it’ll auto-turn off in 30 minutes, long story about stupid tariff rules in Europe), I switch the main output to input 2.
Use: debugging my camera: I switch the HDMI output to input 1, and the teleprompter is now just the camera output.
Use: Green Screen video. With the Green Screen Video setup plugged into input 7, and specially formatted presentation on my laptop (input 3), I use two effects. I have a preloaded piece of media, which is a virtual stage. I turn on the Picture-in-picture effect, inserting input 3 overlaying the “screen” on the virtual stage. I turn on the Chroma Key effect in the ATEM, replacing the greenscreen of input 7 with the virtual stage. It’s a specially formatted layout because I don’t want to be standing in front of a slide deck, I want it off centered, like it’s behind me on a stage.
Green Screen Video
This is the area where I might have gone a little overboard. My office is similar to a suite in a hotel: there is a bedroom and a sitting room, but no doorway, just an arch. Everything I’ve described so far is in the sitting room. The green screen setup is mostly in the bedroom, with parts in the living room.
Everything that is attached to the walls uses Command strips, the velcro-style picture hanging kind. The adhesive on the poster strips is too weak.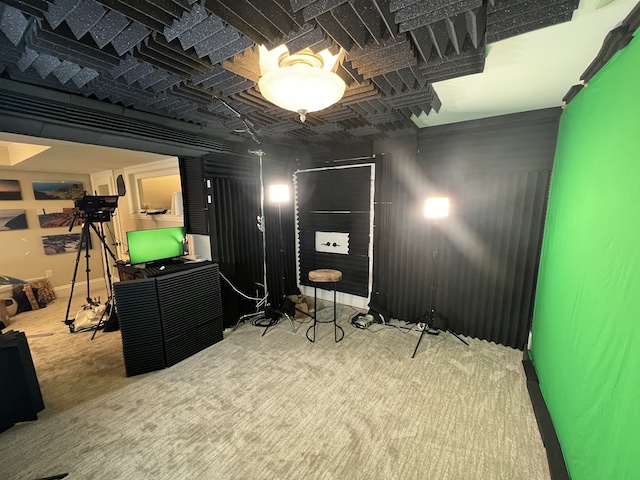
Sound treatments
The walls are all covered in foam. The back wall uses an eggshell foam, with a green screen cloth stretched over it. The cloth is held in place with a set of quilt hangers. The remaining walls, and ceiling, have three-inch acoustic wedge foam, with some oddly shaped foam in other places. I also have acoustic foam mounted onto two tri-fold poster boards (like you’d use in a science fair). One of these shields the dresser I use for storing spare cables; the other blocks half of the archway.
The sitting room wall immediately behind my camera has six pictures, all of which are printed on acoustic foam.
Video setup
My camera is the Black Magic Pocket Cinema Camera (BMPCC) 6K. It’s mounted to a tripod on a rolling cage. The lens is a Canon CN-E 15.5-47. On a separate tripod, in front of the lens is an Ikan tablet teleprompter, so I can drop in an iPad if I’m giving a prepared talk. I have a dresser that is the storage location for most of my unused electronics and cables, on top of it sits a monitor (an LG 27” I picked up at Costco) which is the other output from the HDMI splitter which is my primary desktop’s secondary display output. I use this monitor mostly as a confidence monitor when giving talks.
Lighting is provided by four key lights. Two of them light up the green screen, and two light me up. They are Dracast S Series 500 (three from a package of S-plus, and one independently bought). The temperature on the back two are set to 4400K, and the front two to 5300K, which is also the temperature setting on the BMPCC.
The BMPCC HDMI output runs over to input 7 on the ATEM.
Audio setup
I use two microphones. On one channel is a RODE Boom microphone, that sits just off camera overhead of my usual standing position. The second channel is a Sennheiser wireless lavalier.
For audio out, I connect a RODE Wireless Pro lavalier input to the monitor output on the RODECaster Pro, and connect a second set of BASN in-ear monitors to the Wireless Go output.
Use: Recorded video. For video I want to edit, I generally just record directly to the BMPCC, which has a USB-C portable hard drive, and I move the video over into DaVinci Resolve to edit. Alternatively, I can throw up Quicktime on my mac, and just record instead of (or, often, while) broadcasting live.
Use: Live video. See the Green Screen video use case at the bottom of the DesktopVideo section.
There you have it – a complete home video production studio.